Mark Multiple Clients as Inactive

Have too many clients in your list and want to hide some of the old ones? You’re in luck; now you can mark mark multiple clients as inactive without have to go to each individual record.

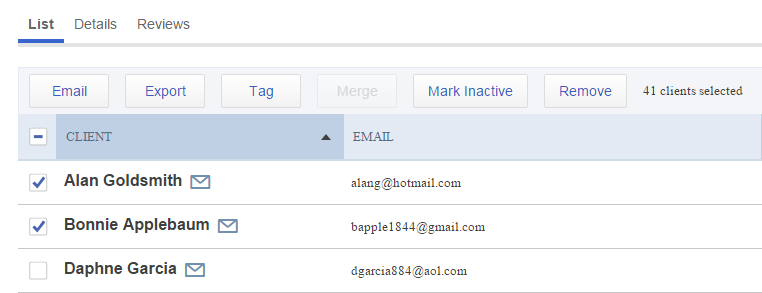
Start from Clients > List and select the names you want.  Remember, you can select a range of records by clicking one at the top, holding down “shift” and then clicking another at the bottom; all the records in between will be selected.  Then click the “Mark Inactive” button.

inactive

Inactive clients are hidden by default.  If you want to see them again, click the “Filter” icon at the top of the list and then under “Viewing clients that are” uncheck the box for “Active only.”

Tagged : / /

Sync Contacts with Quickbooks… for Free!

QuickBooks OnlineIt’s super easy to sync your clients between QuickBooks Online and Full Slate so you never again have to  manually enter contact info twice.  Bonus – now you can connect to QuickBooks Online for free (a little perk of being an Intuit company)!

If you were previously being charged a connection fee, we already removed this line item from your bill; you’ll no longer have to pay $5/mo to sync. But you may need to reconnect if you connected to QuickBooks before June 30, 2014.  We recently upgraded to the latest, greatest application programming interface (API), as the previous version is no longer supported.  All the old connections were removed, so we won’t be able to sync again until you re-authorize Full Slate to access your QuickBooks data – which is easy to do!

Whether you’re an old-timer or a new-comer, you can establish a connection by going to the new “QuickBooks Sync” tab under Setup.

Connect to QuickBooks

  1. Go to Setup > QuickBooks Sync and click the “Connect to QuickBooks” button.
  2. Enter your QuickBooks account credentials.
  3. Select the company you want to connect to and click Continue.
  4. Authorize Intuit to share your data with Full Slate.

Just the beginning of great things to come with QuickBooks Online…

Tagged : / / /

New Client Fields: Source & Referrer

You can track how clients find your business using new ‘Source’ and ‘Referrer’ fields.

Under Clients > Details, each client record now includes ‘Source’ and ‘Referrer’ fields that allow you to record where the client heard about you. If a new client was referred by a colleague or other client, you can record this in the ‘Referrer’ field in Source Referrerorder to ensure you thank them later. And if a client found you on Yelp or saw your flyer at the local coffee shop, you can record that in the ‘Source’ field.

Both are basic text fields, giving you the flexibility to capture anything you want.

Tagged : /

Invite Clients to Register

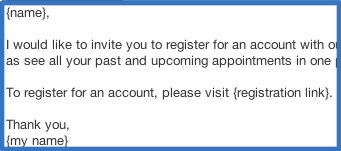
Encouraging your clients to register for a Full Slate account is easier than ever. Using the new built-in email template, you can invite clients to sign up and their account will automatically be linked with your client record.

You can customize the new template — titled ‘Invite Client to Register’ — under Messages > Templates. To send it to a client, open up the client’s record under Clients > Details, click ‘Send message’ and select that template. Or you can send out the template in bulk under Clients > List. The email includes a link with a unique code, which when clicked by your client will take them to a registration page with their name and email pre-filled. They just need to enter a password and they’re done.

You’ll know they’ve registered when their client record says  “Registered as [email protected]”.

Full Slate does not require registration to book an appointment, but both you and your clients benefit from registration. So invite your clients to register today!

Tagged : /

Past & Upcoming Appointments on Mobile

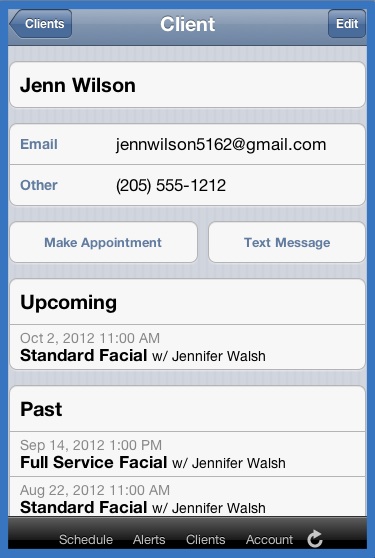
You can now view a client’s past and upcoming appointments on your mobile phone. Do clients occasionally call to find out when their next appointment is? Do you need to know details from a client’s last appointment in order to book their next one?

No more scanning endlessly through your busy calendar. Now you can quickly find the information you need to answer client questions and book their next appointment.

To view past and upcoming appointments on your iPhone or Android, click on the Clients tab, select the client you need and you’ll find all their upcoming and past appointments at the bottom of their client details page. Click on an appointment for notes and other details.

For more on Full Slate Mobile, click here.

Now it’s even easier to stay on top of your schedule on the go!

Tagged : / / /

Benefits of Client Registration

When your clients register for a Full Slate account, they benefit in many ways…and so do you.

Full Slate does not require clients to register to schedule appointments online. But if your clients choose to register, which takes less than a minute, there’s much to gain. After they register, they will no longer have to re-enter their contact information each time they book an appointment. Even their credit card information will be available if you offer online payments. They’ll also be able to see all their past and upcoming appointments including the date, provider and service. And best of all, they’ll be able to cancel and reschedule any upcoming appointments within your cancelation rules.
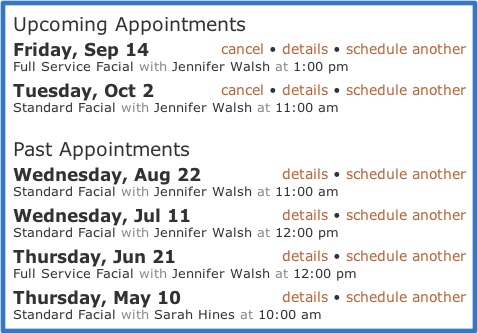
You gain too when your clients register. Because clients can easily cancel and reschedule online, as well as see their past and upcoming appointments, they’re much less likely to call or email you. Further, when your clients log in to book an appointment, you can be assured their appointment will be matched with your client record, avoiding duplicates.

Clients are provided an opportunity to register after they book an appointment. You can also invite your clients to register by directing them to your registration page, which is at https://yourlandingpage.fullslate.com/register (just be sure to include your landing page in that web address).

You can determine if a client has registered for a Full Slate account by viewing their record under Clients > Details. At the top of the gray box on the right, it will either say “Not registered” or “Registered as [email protected]”.

We won’t market to your clients or sell their information to others, so go ahead and encourage your clients to register today!

Tagged : / /

Client Registration Not Required

Did you know your clients don’t have to create a Full Slate account to book an appointment but you can still maintain a full history on each client?

Though there are compelling reasons for your clients to register for a Full Slate account (more on that in a future blog post), some clients prefer not to. And what will these clients do if they’re required to register? They’ll pick up the phone and call you, starting the inevitable game of phone tag…or worse yet, decide not to book an appointment after all. That’s why Full Slate does not require client registration; we don’t place barriers in front of your clients that might discourage them scheduling online.

“But won’t that result in a new client record every time my clients book an appointment?” you say. No, because Full Slate employs sophisticated logic to match client bookings with existing client records. As a general rule, if there’s a match on client email and a close match on client name, Full Slate will match the client booking with the client record. For example, if you have client Dan Fowler with email [email protected] in your client list, and Dan books (without registering) as Daniel Fowler at [email protected], Full Slate will match them up.

And in cases where a duplicate client record is created, you can easily merge the two records using the handy client merge feature!

Tagged : / / /

Merge Duplicate Client Records

You can now merge duplicate client records to more effectively maintain contact information and track client history. Although Full Slate generally matches client-booked appointments with existing client records, duplicate client records are sometimes created. Now it’s easy to merge those duplicates into a single record to maintain contact information, past and upcoming appointments, and message history in one place.

To merge client records, go to the Clients > List tab, select the client records you want to merge (up to a total of five) and click Merge. Conflicting information will be highlighted so you can select what you want in the merged record. Click OK and you’re done!

Please note this operation cannot be undone, so review the information carefully before finishing.

Tagged : / / /